
Authentication and authorisation are the cornerstones of online security. They verify the user’s identity which is commonly done by entering a username and password. Similarly it also ensures that the correct user is accessing the requested information which is often sensitive. But the process of user authentication in frameworks like Symfony is a bit confusing to set up. However, we now have a service called Auth0 which simplifies Symfony user authentication process. Hence in this article, I am going to show you step by step How to Authorise Auth0 User In Symfony4.
We have been using Auth0 for quite some time and as a developer I find this way efficient to authorise Auth0 user in Symfony 4.
(You can see the projects we did with Symfony PHP Framework.)
Introduction to Symfony4
First of all, just in case you didn’t know, Symfony is a php framework for web projects. The most significant aspect of Symfony comes from the fact that it has a lot of reusable PHP component. These components are used throughout PHP land. Likewise, tools like WordPress, Drupal, phpBB and Laravel depend on Symfony Framework components a lot. If you are new to Symfony, you can go through the process of project setup to create symfony web application from here.
Introduction to Auth0
Auth0 is a service that provides authentication and authorisation. It is an API that plays a bridge role between users and application. Similarly, it can connect any applications written in any programming language. It provides the clients with IDs and credentials which we can use in our app. Then it verifies identity of users and sends back the required information to the app when users try to authenticate each time. For further information about Auth0, we can go through the documentation of Auth0 Api.
Why authorise Auth0 user in Symfony4?
Well, we authorise Auth0 user in Symfony4 due to its benefit. Auth0 has several benefits and some of them are:
- Extensibility
- Simple APIs
- User-Centered
- Standard Protocols
- Sdks
- Analytics
- Multi-factor Authentication
- Device Agnostic
- Scalable and reliable
- Single Sign On
- Cloud Hybrid
- Social Logins
These are just some of the benefits that make your life as a developer certainly much easier. If you want to know more about Auth0 and its benefits, you can learn about it from here.
How to Authorise Auth0 User In Symfony4?
Now in this section, I will explain you how to Setup Auth0 Account, Get Access Token & decode it, Access API Endpoints and prevent the access of Symfony API-endpoints of unauthorised users. Let’s start the step by step guide with Auth0 Account Setup.
(Want to jump directly to see how we implemented this? See our own example in github.)
Auth0 Account Setup
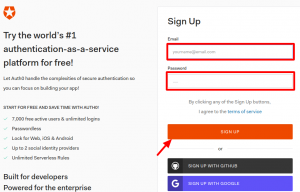
First signup for auth0 account from here: AuthO account signup.
(The page will look like this.)
After signup, you can login into the system and create Single Page Application for frontend at Applications/Create Application.
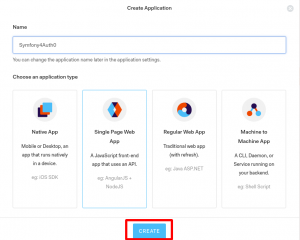
The ClientId and Client Secret of this Single Page Application will be used to get Access Token for authorisation API endpoints later.
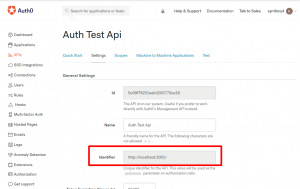
Now, you need Auth0 Audience(Identifier) to generate Access Token for Single Page Application.
In order to get Identifier, you should create an API at API section and Create API.
You will get your Identifier at APIs/API_name/Settings.
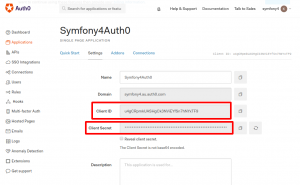
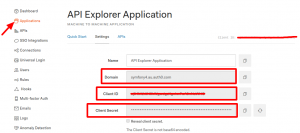
In order to communicate between Symfony and Auth0, you need ClientID, Client Secret and Auth0 Domain of API Explorer Application.
You can get all these at Applications/API Explorer Application/Settings.
Now define the above keys in symfony application’s .env file.
After that fetch Access Token required to authorise our API endpoints.
Get Access Token
Access Token is a credential that can be used by an application to access API endpoints. You can fetch this token using Auth0 Domain, ClientID, Client Secret and Audience(Identifier) of Single Page Application using either of below two ways:
- Js code snippet OR,
var webAuth = new auth0.WebAuth({
    domain: 'auth0_domain',
    clientID: client_id,
    audience: 'identifier',
    responseType: 'token id_token',
    scope: 'openid profile',
    redirectUri: window.location.href
  });
2. From APIs/API_name/Test
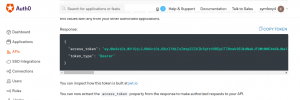
After fetching Access token, you have to decode the token in order to authorise the API endpoints.
Decode Access Token
First of all inject the Access Token to User Provider to decode it or get user profile.
User Provider is a class that decodes the Access Token.
To create User provider class, install JWT Authentication Bundle to install the dependencies.
| composer require auth0/jwt-auth0-bundle:“~3.0” |
User Provider class decodes the token for those users who are assigned with certain roles which will be later used in the route while accessing API endpoints.
You need to configure the User Provider to decode the token at Symfony’s file config/packages/security.yaml under providers key.
security:
   providers:
        a0:
             id:
               a0_user_provider
The Provider Class under providers key a0_user_provider is used as service.
parameters:

services:
   a0_user_provider:
       class: App\Security\A0UserProvider
       arguments: ["@jwt_auth.auth0_service"]
Finally, to decode the Access Token, you should configure framework.yaml under Symfony’s file config/packages/framework.yaml to check whether the Access Token is issued by authorised issuer or not.
jwt_auth:
   domain: '%env(AUTH0_DOMAIN)%'
   authorised_issuer: https://%env(AUTH0_DOMAIN)%/
   api_identifier: '%env(AUTH0_AUDIENCE)%'
Now that you have fetched and decoded the Access Token, the final step is to access the API endpoints.
Access Api Endpoints
Before accessing the API endpoints, you have to configure the security.yaml file under the key security’s firewall at config/packages/security.yaml for the url pattern /api.
security:
   firewalls:
       secured_area:
             pattern: ^/api
             stateless: true
             simple_preauth:
               authenticator: jwt_auth.jwt_authenticator
Finally, you authorise the API endpoints for url /api/hello using @Route annotation.
Annotations are metadata that can be embedded in source code.
The role ROLE_AUTH0_AUTHENTICATED for which the Access Token was decoded earlier is now used as @IsGranted annotation.
/**
* @Route("/api/hello", name="hello")
* @IsGranted("ROLE_AUTH0_AUTHENTICATED")
*/
public function hello()
{
   return $this->json([ 'message' => 'Hello World!' ]);
}
The user role ROLE_AUTH0_AUTHENTICATED in which Access Token is assigned can access the above API endpoints, otherwise the user is forbidden.

What’s Next?
In this article, we discussed about how to authorise Auth0 user in Symfony 4. Likewise in the next article, we will discuss about the use of Auth0 Management Api to create Auth0 user with permissions & scopes and assign roles to them. So stay tuned!
Meanwhile if you have any questions regarding How to authorise Auth0 user in Symfony4, do comment down below or write to us.